

Shut off the dishwasher and its water supply, kill the power at the breaker if water is anywhere near outlets, and take timestamped photos before you touch anything else. Those three moves, done in order, are the entire first minute of dishwasher leak cleanup. Everything after that is about drying fast enough to beat mold and documenting well enough to protect an insurance claim.
Each step earns its place in that order for a specific reason. Shutting off the appliance and water stops the flood from growing. Cutting power removes the shock risk that wet electrical components create. Photographing the scene before you mop, unplug cords, or pull out cabinets preserves the evidence an insurance adjuster will ask for later, and it costs you nothing but thirty seconds.
Mold can begin colonizing damp materials within 24 to 48 hours of water exposure, and a musty smell usually means it already has. That window is why speed matters more than perfection in the first hour.
A few things to flag before you move past this checklist:
- Never touch a wet electrical panel, outlet, or the dishwasher's controls with wet hands or bare feet on a wet floor.
- Standing water near an outlet or appliance cord means the breaker comes off before you extract anything.
- Treat any water that's been sitting for more than a few hours as potentially contaminated, not just "dirty."
Key Takeaways
Fast shutoff, immediate documentation, and aggressive drying within the first 24 to 48 hours are what separate a manageable dishwasher leak from a mold remediation project.
| Point | Details |
|---|---|
| Shut off first | Kill water supply and power immediately, especially if water is near outlets. |
| Document before demo | Take timestamped photos and video before removing any wet materials. |
| Dry within 24 to 48 hours | Mold colonization risk begins in this window per EPA guidance. |
| Watch for red flags | Musty odor, springy flooring, or water under cabinets means it's time to call a pro. |
| Pure Resto responds fast | Offers 30-minute emergency response and direct insurance billing across Maryland. |
Table of Contents
- Dishwasher Leak Cleanup: The First-Hour Checklist
- Is It Safe to Clean Up a Dishwasher Leak Yourself?
- Where Is My Dishwasher Leaking From?
- How Do You Remove Standing Water After a Dishwasher Leak?
- Drying Steps to Prevent Hidden Damage and Mold
- How Do You Check for Hidden Water Damage Behind Cabinets and Floors?
- Which Materials Can You Salvage After a Dishwasher Leak?
- What Should You Document for a Dishwasher Leak Insurance Claim?
- When Should You Call a Restoration Professional?
- How Do You Prevent Future Dishwasher Leaks?
- Why Moisture Mapping and Controlled Drying Matter
- Get Fast, Documented Help From Pure Resto
- Sources
- FAQ
Dishwasher Leak Cleanup: The First-Hour Checklist
The first hour decides how much of this becomes a weekend chore versus a multi-week restoration job. Work through these steps roughly in order, adjusting as your situation demands.
- Cancel the wash cycle and open the dishwasher door if it's safe to do so.
- Shut off the water supply at the valve under the sink or at the appliance's dedicated shutoff.
- Cut power by unplugging the unit or switching off its breaker, especially if water has reached the floor near outlets.
- Move people and pets away from the wet area until you've assessed slip and shock hazards.
- Soak up standing water with towels, a mop, or ideally a wet/dry vacuum for anything beyond a shallow puddle.
- Pull out rugs and nearby contents so they can start drying separately instead of sitting in the spill.
Documentation happens in parallel with cleanup, not after it. Before you move a single towel, take wide shots of the kitchen, close-ups of the water's edge, and a short video showing where the water is actively coming from. Note the discovery time and, if anyone else witnessed the leak starting, get their name down while it's fresh.
Pro Tip: A wet/dry vac pulls far more water per minute than towels ever will, and it gets underneath the front kick plate where mops can't reach. If you own one, this is the moment it pays for itself.
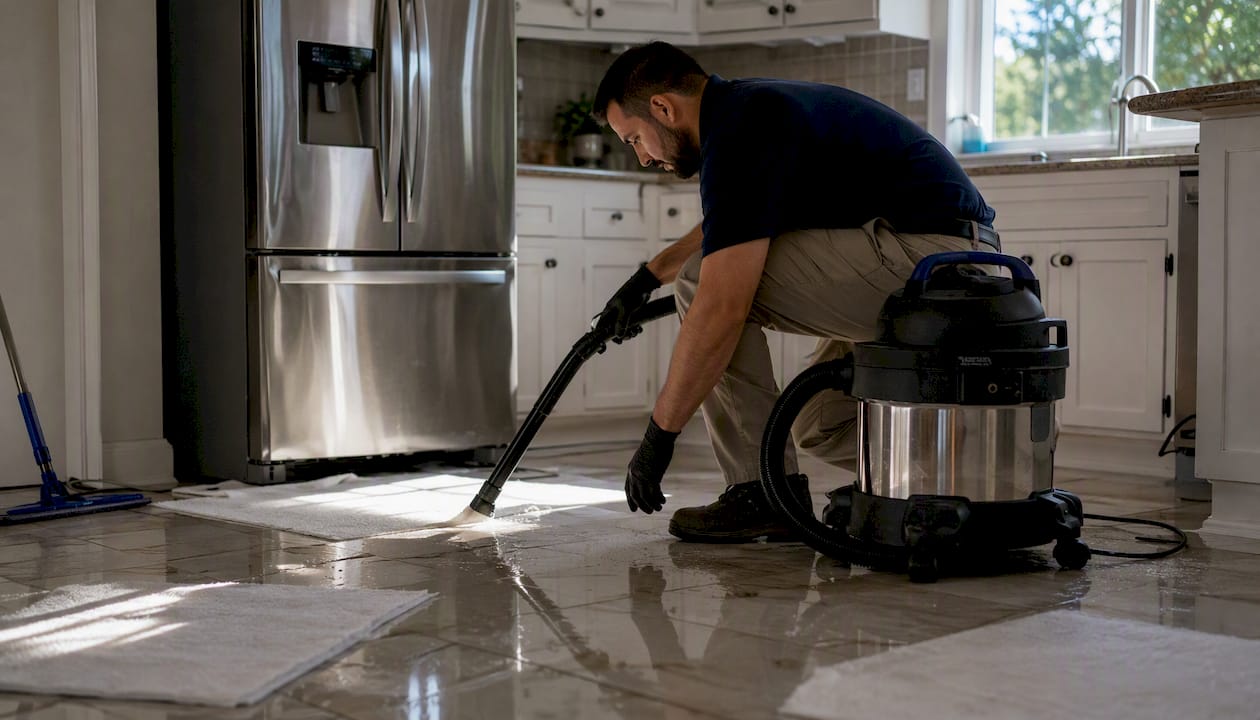
Quick containment matters too. Lay towels or a strip of plastic sheeting along the base of adjacent cabinets to stop wicking while you work, and set buckets under any active drip points you can't immediately stop.
Is It Safe to Clean Up a Dishwasher Leak Yourself?
Cut the power before you do anything else if water is near outlets or the appliance itself, and never handle switches or plugs with wet hands. That single rule governs almost every safety decision in the first hour.
Beyond electrical risk, you're dealing with slip hazards on a wet floor and the possibility that standing water isn't as clean as it looks. Wear rubber-soled shoes, nitrile or rubber gloves, and eye protection if you're working near a spray source or reaching into tight cabinet spaces. If you see visible wiring damage, scorch marks, or water sitting inside an outlet, stop and wait for a licensed electrician or restoration professional. That's not a job for a paper towel and good intentions.
Water quality matters more than most homeowners assume. Fresh supply-line water is generally clean. Water that's been sitting for hours, or that came from a drain-line backup, should be treated as contaminated, meaning you want gloves on and you want to avoid tracking it through the rest of the house.
The most dangerous leaks are the slow, invisible ones that happen under the unit. They saturate subfloor layers and keep feeding mold growth even after the surface looks completely dry.
Pro Tip: If the floor near the dishwasher feels soft or springy underfoot, stop walking on it repeatedly and call a professional before you do more damage to a weakened subfloor.
Where Is My Dishwasher Leaking From?
Check four spots first: the supply line and its fittings, the drain hose and its high loop, the door gasket, and any sign of oversudsing. Identifying which one is failing tells you whether this is a five-minute DIY fix or a reason to stop using the appliance entirely.
- Supply line or inlet valve: A loose fitting often just needs tightening; a cracked line or failed valve means water pressure is actively working against you and the line should stay shut off until replaced.
- Door gasket: A worn or misaligned gasket is one of the more common and easily fixed causes, and it usually just needs cleaning, reseating, or replacing.
- Drain hose: A kinked or clogged hose can back up and overflow; check that the high loop under the sink hasn't collapsed or come loose.
- Tub or pump: Cracks in the tub or a failing pump are more serious and typically point toward replacement rather than repair, especially on an older unit.
- Oversudsing: Using regular dish soap instead of dishwasher detergent creates excess foam that pushes past seals; switching detergents solves this instantly.
Pro Tip: Run a short test cycle with the kick plate off and towels underneath before trusting the dishwasher again. If the leak comes from the tub or pump, that test will show you before it floods the kitchen a second time.
Stop using the dishwasher immediately if you spot a ruptured supply line, a cracked tub, persistent overflowing even after adjusting detergent, or any burning or electrical smell. Those aren't situations to troubleshoot on your own timeline.
How Do You Remove Standing Water After a Dishwasher Leak?
Get standing water out immediately using towels, a mop, or a wet/dry vacuum, then move wet contents out of the area and prop them up so air can reach every surface. Speed here directly limits how far water travels into subflooring, drywall, and adjacent rooms.
A wet/dry vac beats a mop for anything more than a light spill because it pulls water out of grout lines, along baseboards, and from under the toe kick where a mop head simply can't reach. For heavier flooding, home centers and equipment rental shops carry larger extraction units and commercial-grade fans worth renting for a day rather than buying.
Useful equipment to have on hand:
- Wet/dry vacuum
- Absorbent towels and a mop
- Buckets for active drips
- Plastic sheeting or containment barriers for cabinet edges
- Rented air movers or extraction equipment for larger spills
Document as you extract, following this order:
- Wide shots of the full kitchen showing the extent of the spill.
- Close-ups of the water's edge against cabinets, flooring seams, and baseboards.
- A clear photo of the supply line and drain connection where the leak originated.
- Images showing spread into adjacent rooms, hallways, or basements below.
Restoration case studies show dishwasher leaks frequently travel well beyond the kitchen, sometimes reaching living rooms or play areas through subfloor gaps, which is why wide-angle "spread" photos matter as much as the close-ups.
Drying Steps to Prevent Hidden Damage and Mold
Aggressive drying with air movers and a dehumidifier, backed by actual moisture readings, is what prevents mold. Start within 24 hours whenever you can, because that's roughly the window before damp materials become a mold problem instead of a drying problem.
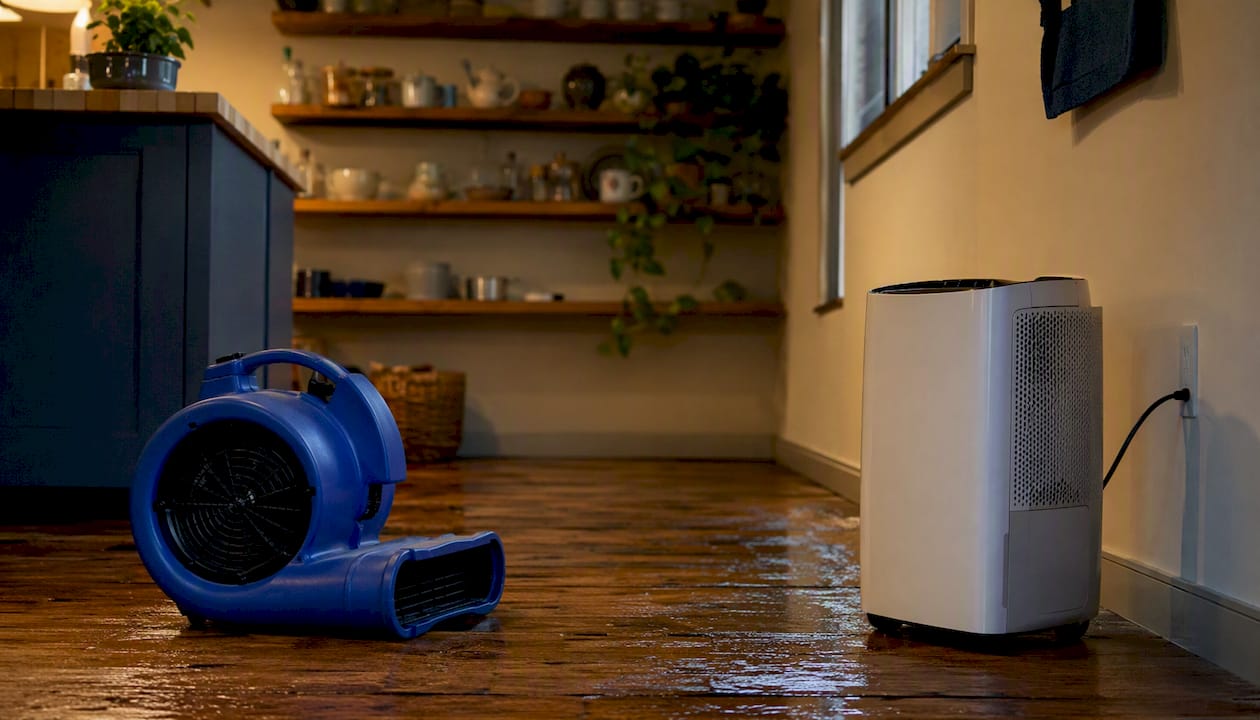
Position air movers to blow across wet surfaces rather than directly at a wall, and run at least one per affected room, more for open-plan spaces. A dehumidifier pulls the moisture those air movers are releasing into the air; without one, you're just redistributing humidity around the kitchen instead of removing it. Crack a window or run an exhaust fan if outdoor humidity is low, but skip that step entirely on a humid day, since you'd be pulling more moisture in than you're pushing out.
| Material or benchmark | Typical timeline |
|---|---|
| Mold colonization risk begins | 24–48 hours after exposure |
| Household fans alone (surface puddle only) | Effective only for very limited, shallow spills |
| Professional structural drying (subfloor, drywall) | Multiple days with monitored equipment |
| Moisture meter reading target | Matches the material's normal dry baseline before drying is considered complete |
Pro Tip: A household box fan moves air, but it doesn't actively remove moisture from the air the way a refrigerant dehumidifier does. For anything beyond a small surface spill, pair the two rather than relying on fans alone.
Mold can begin colonizing within 24 to 48 hours of water exposure, and that timeline doesn't pause because you're busy or waiting to see if the floor "just dries out." A moisture meter, not a visual check, is the only reliable way to confirm a material has actually reached a safe baseline.
How Do You Check for Hidden Water Damage Behind Cabinets and Floors?
Assume hidden moisture is present until you've checked toe kicks, cabinet bases, adjacent flooring, and baseboards, and smell for mustiness in each spot. If any of those checks raise a flag, hold off on further demolition until you've documented what you've found.
Work through the inspection methodically:
- Pull the kick plate off the dishwasher cabinet and shine a flashlight underneath.
- Press a screwdriver or probe gently into the base of nearby cabinets to check for softness.
- Run your hand along adjacent baseboards, feeling for swelling or bubbled paint.
- Smell each area directly rather than relying on the general kitchen air.
- Use a moisture meter on flooring and drywall if readings are available, or bring in a professional with a thermal camera for anything you can't visually confirm.
Open walls or pull baseboards when you find a soft or spongy subfloor feel, bubbling or peeling paint near the floor, a musty smell that doesn't dissipate, or moisture meter readings well above the material's normal dry range. Short of those signs, invasive demolition usually creates more repair work than it prevents.
Which Materials Can You Salvage After a Dishwasher Leak?
Non-porous surfaces and most contents are often salvageable with prompt drying and cleaning. Porous structural materials, especially saturated subflooring, particle-board cabinet bases, and soaked drywall, frequently need to come out.
| Material | Salvage outlook | Why |
|---|---|---|
| Solid hardwood flooring | Sometimes, if caught fast | Can cup or warp from moisture below; drying within hours limits permanent distortion |
| Engineered wood flooring | Often not salvageable | Layered construction delaminates when the core layer swells |
| Laminate flooring | Rarely salvageable | Fiberboard core swells permanently once wet |
| Ceramic or porcelain tile | Usually salvageable | Non-porous surface; grout and underlayment beneath are the real concern |
| Underlayment/subfloor | Depends on saturation | Plywood can often dry; particle board and OSB frequently need replacement |
| Drywall (lower few inches) | Often needs cutting out | Wicks moisture upward and stays damp long after surfaces feel dry |
| Cabinet bases (particle board) | Frequently need replacement | Veneer can hide swelling and rot underneath until it's advanced |
Pro Tip: Press a fingernail into the bottom edge of a cabinet base after a leak. If it dents easily or feels soft, the particle board has already started breaking down, even if the surface veneer still looks fine.
Cost expectations vary widely depending on how far water traveled and how long it sat before discovery, and common, fixable causes account for most flooding events, which is worth remembering before assuming the worst about total replacement.
What Should You Document for a Dishwasher Leak Insurance Claim?
Photograph and video everything, wide shots and close-ups, before you remove any materials, and keep a running log with timestamps. That order of operations, document first, remove materials second, is the single biggest factor in whether a claim goes smoothly.
Your documentation checklist:
- Wide-angle and close-up photos of every affected area, taken before cleanup begins.
- A short video showing the active leak or water's spread pattern.
- Written notes with times: when you discovered the leak, when you shut off water and power, when you called a plumber or restoration company.
- Receipts for any emergency purchases, wet/dry vac rental, or mitigation equipment.
- Contact names and companies for anyone who came out to assess or repair the issue.
Homeowner insurance typically covers sudden, accidental appliance leaks but often excludes damage traced to a long-term, neglected leak that went unaddressed for weeks or months. That distinction is exactly why immediate photos matter: they establish the leak as a sudden event rather than something that had been slowly worsening.
| Step | What to record |
|---|---|
| Discovery | Date, time, and how you found the leak |
| Mitigation | Every action taken (shutoff, extraction, drying) with timestamps |
| Professional inspection | Inspector name, company, and findings |
| Claim notification | Date you contacted your insurer and claim number issued |
Restoration companies consistently advise against ripping out flooring or baseboards before this documentation is complete, since undocumented demolition can leave you arguing about damage extent with nothing to back up your claim.
When Should You Call a Restoration Professional?
Call a professional if water has spread under cabinets or into the subfloor, if you notice a musty odor, if flooring feels springy underfoot, or if water reached electrical components. Any one of those signs on its own is reason enough to bring in help rather than continuing DIY drying.
On arrival, a restoration team typically starts with moisture mapping, using meters and often thermal imaging to trace exactly how far water traveled, including under cabinets and flooring you can't see. From there, restoration workflows generally include targeted containment, demolition only where actually needed, deployment of air movers and dehumidifiers sized to the space, and daily monitoring until every material hits its drying target, not just until it looks dry.
- Moisture mapping across affected rooms, including areas that look untouched.
- Containment barriers to keep drying equipment focused and prevent cross-contamination.
- Selective demolition of only the materials that test wet or show damage.
- Equipment deployment sized to the square footage and material types involved.
- Daily moisture logs until every reading returns to baseline.
Pro Tip: Ask any restoration company for their IICRC certification and a copy of their daily moisture logs before work begins. Legitimate professionals track and share this data as a matter of course, not as a special request.
Trust signals worth asking about include IICRC-certified technicians, documented moisture logs updated daily, and detailed equipment reports you can hand to your insurer. Pure Resto brings a 30-minute emergency response window and direct insurance billing to Maryland homeowners dealing with exactly this kind of leak, which matters most in that first hour when speed determines how much of the house you're drying out later.
How Do You Prevent Future Dishwasher Leaks?
Inspect the door gasket every six months, swap rubber supply hoses for braided stainless every five to ten years, clean the filter regularly, and avoid running the dishwasher when nobody's home. That maintenance rhythm catches most failures before they become floods.
A leak-detection sensor placed under the dishwasher can alert you the moment water appears, often before you'd notice it yourself. Smart water-shutoff valves take it a step further, cutting supply automatically when they detect an anomaly. Neither is expensive relative to even a modest cleanup, and both are worth considering for any kitchen where the dishwasher sits above finished flooring or a basement below.
- Avoid regular dish soap in the dishwasher; it causes oversudsing that stresses seals and gaskets.
- Keep the drain hose's high loop intact and unkinked.
- Check the float assembly periodically to confirm it rises and falls freely.
- Replace worn door gaskets at the first sign of cracking or hardening.
Pro Tip: Loose supply lines and worn gaskets cause a disproportionate share of leaks and take five minutes to check. Make it part of your semiannual home maintenance instead of waiting for a puddle to remind you.
If you suspect a slow leak but can't pinpoint its source, a professional leak-detection service can locate hidden moisture without tearing into walls or flooring, which is often faster and less destructive than guessing.
Why Moisture Mapping and Controlled Drying Matter
Professional moisture mapping and controlled drying materially reduce long-term damage and improve insurance outcomes, and the reason comes down to precision. A household fan tells you nothing about what's happening inside a wall cavity or under a subfloor; a moisture meter does.
Mold can begin colonizing damp materials within 24 to 48 hours of exposure. That statistic isn't a scare tactic, it's a scheduling constraint. It means the gap between "I'll deal with this this weekend" and "I dried this today" can be the difference between a clean cleanup and a mold remediation project layered on top of a water damage claim.
Restoration standards built around the IICRC S500 guidelines emphasize measured drying targets over visual inspection, meaning a room isn't considered dry because it looks and feels dry, but because instrument readings confirm materials have returned to their normal moisture baseline. Daily monitoring exists because materials dry unevenly. A subfloor's top layer might read dry on day two while the layer beneath it stays saturated for another week without active air movement and dehumidification.
Homeowner measures like box fans and open windows work fine for a small, shallow puddle. They fall short the moment water has soaked into subfloor, drywall, or cabinet bases, because those materials release moisture far slower than they absorb it.
What Restoration Professionals Wish Homeowners Knew
The mistakes we see most often aren't dramatic. They're small decisions made under stress: ripping out wet flooring before a single photo gets taken, running a box fan for two days and assuming that counts as "dry," or plugging the dishwasher back in and starting a full cycle without watching it happen.
Document first, every time, even when the instinct is to start cleaning immediately. Controlled drying with real equipment and moisture readings beats guesswork, no matter how many fans get pointed at the floor. And after any repair, run one monitored cycle with the kick plate off and towels underneath before trusting the appliance to a normal, unattended wash. If it leaks again from a compromised tub or pump, you'll know before it reaches the subfloor a second time.
Pro Tip: Keep every receipt, every photo, and every timestamp in one folder from the moment you find the leak. Adjusters move faster when the evidence is organized before they ask for it.
Get Fast, Documented Help From Pure Resto
Pure Resto provides 24/7 emergency water mitigation, moisture mapping, mold inspection, and reconstruction for Maryland homeowners, backed by a 30-minute emergency response window that most independent contractors simply can't match. When a dishwasher leak has already reached the subfloor or spread into a second room, that response speed is the difference between a contained repair and a spreading mold problem.
Every technician on a Pure Resto job carries IICRC certification, and every job includes daily moisture logs and detailed equipment reports you can hand directly to your insurance adjuster. Pure Resto also bills insurance directly, which means you're not fronting restoration costs while a claim works its way through review. If the leak also soaked carpet or rugs nearby, professional carpet cleaning can salvage material that a home vacuum and fan setup would leave permanently damp underneath. And if you're seeing early signs of mold near the cabinet base, a dedicated mold inspection confirms what's actually happening behind the walls before it spreads further.
If your dishwasher has flooded and you're unsure whether you're looking at a DIY fix or a bigger problem, call Pure Resto and describe what you're seeing. The team will walk you through what to check immediately and can have someone on site fast enough to matter.
Sources
- EPA: A brief guide to mold, moisture, and your home
- Intensa Dry: When a dishwasher leak spread through an Allen, TX home (case study)
- MoneyGeek: Does homeowners insurance cover dishwasher leaks?
- GE Appliances support: Dishwasher leaks and troubleshooting
FAQ
What Do I Do if My Dishwasher Is Leaking From the Bottom?
Shut off the water supply and power immediately, then check the door gasket, supply line, and drain hose, since these are the most common sources of a bottom leak. If the leak keeps recurring after you've checked those spots, the tub or pump may be cracked and the unit likely needs replacement.
What Can I Put Under the Dishwasher to Catch Leaks?
A leak-detection sensor paired with an absorbent tray gives you both early warning and containment, which works better than a tray alone. Some homeowners also install a water-shutoff valve that closes automatically when the sensor detects moisture.
How Do I Remove Black Mold From Under My Dishwasher?
Small surface mold on non-porous materials can sometimes be cleaned with standard mold-cleaning products and thorough drying, but mold on or inside porous materials like particle-board cabinet bases usually means those materials need to be removed rather than cleaned. If the mold has spread beyond a small, easily visible spot, a professional mold inspection is the safer next step.
Is It Worth Fixing a Leaky Dishwasher?
It depends on the source: gasket, supply line, and detergent-related leaks are usually simple, inexpensive fixes worth making. Leaks from a cracked tub or failing pump, especially on an older unit, often cost more to repair than the appliance is worth, making replacement the more practical choice.
When Should I Call a Restoration Professional Instead of Cleaning Up Myself?
Call a professional if water reached the subfloor, if you smell mustiness that doesn't clear after drying, or if flooring near the dishwasher feels soft or springy. Pure Resto's 30-minute response window in Maryland means you can get moisture mapping and professional drying started before those early signs turn into a larger mold problem.