

If you're staring at a stain, a bulge, or an active drip, act immediately. The single most important step is stopping the water source, because every minute of continued flow expands the damage above your ceiling where you can't see it. Delaying repairs raises the risk of structural damage and significantly higher repair costs, and what looks like a minor stain can mask a much larger moisture spread in the framing above.
Your immediate checklist:
- Turn off the water supply valve (or cover the roof breach temporarily) to stop the source
- Place buckets under active drips; lay towels to contain spreading water on floors
- Kill power to any circuit where water is near a light fixture, junction box, or outlet — water and live wiring above ceilings are a serious electrocution risk
- Move furniture, rugs, and valuables out of the affected area
- Photograph everything before you touch anything else
⚠️ Safety first: If the ceiling is visibly bulging or sagging, keep people out of that room. A waterlogged ceiling section can collapse without warning. If water is actively dripping from or near a light fixture, treat it as a live electrical hazard and cut power at the breaker before doing anything else.
Pro Tip: Poke a small pilot hole in the center of a bulging ceiling section with a screwdriver — only after placing a bucket directly below and confirming the power is off. A controlled drain prevents a sudden, damaging collapse and gives you a chance to assess what's above.
Key Takeaways
Ceiling water damage requires immediate action: stopping the source, cutting power near wet fixtures, and documenting everything before repairs begin are the three steps that protect both your home and your insurance claim.
| Point | Details |
|---|---|
| Stop the source first | Shut off water or cover the roof breach before anything else — continued flow expands hidden damage fast. |
| Electrical safety is non-negotiable | Cut power to any circuit near a wet ceiling before touching fixtures or beginning cleanup. |
| DIY has clear limits | Small, dry, mold-free stains on firm drywall are DIY-eligible; anything larger, soft, or contaminated needs a pro. |
| Repair costs vary widely | Minor repairs typically cost a few hundred dollars; moderate jobs cost up to several thousand dollars; severe structural damage repairs are significantly more expensive, according to industry data. |
| Purerestomd for Maryland homeowners | 24/7 emergency response, IICRC-aligned assessment, and direct insurance billing — call for same-day mitigation. |
Table of Contents
- What does ceiling water damage actually look like?
- Where do ceiling leaks usually come from?
- Step-by-step actions to limit damage right now
- When can you DIY, and when do you need a pro?
- What restoration professionals actually do
- How to repair a small, dry ceiling stain yourself
- How to prevent ceiling leaks before they start
- Insurance and what ceiling repairs actually cost
- Purerestomd's perspective on ceiling water damage
- Purerestomd responds 24/7 to ceiling water damage in Maryland
- Sources
- FAQ
What does ceiling water damage actually look like?
Catching water intrusion early can mean the difference between a $400 cosmetic fix and a $5,000 structural repair. The signs range from obvious to easy-to-miss.
Visible signs to check:
- Yellow or brown stains with a ring-like border — the classic water mark left as minerals dry out
- Bubbling, peeling, or blistering paint — water is trapped just beneath the surface
- Sagging or soft drywall — the ceiling material has absorbed enough water to lose structural integrity
- Discoloration or dark patches that spread or change shape over time
- Wet or corroded light fixtures — a direct sign water has reached electrical components
- White chalky deposits (efflorescence) on concrete or plaster ceilings near exterior walls
Sensory and indirect signs:
- A persistent musty or earthy odor, especially after rain or running upstairs plumbing
- Higher indoor humidity in one room without an obvious cause
- Pest activity near ceiling edges — moisture attracts insects and rodents
Pro Tip: A stain that looks dry and painted over is not necessarily resolved. Paint acts as a membrane and can seal moisture underneath, hiding active mold growth and compromised framing. Press gently on a stained area — if it feels soft, spongy, or gives slightly, the drywall is still wet or already deteriorating.
Where do ceiling leaks usually come from?
Ceiling leaks most often originate from roof problems or upper-floor plumbing, but the visible drip point is frequently not the actual source. Water travels along framing, pipes, and insulation before it finds a low point and drips through. That means the stain on your living room ceiling could be fed by a leak six feet away horizontally.
The main source categories and their diagnostic clues:
- Roof failure: Stains appear only after rain or snow melt. Check damaged or missing shingles, cracked flashing around chimneys and vents, clogged gutters causing water backup, and penetrations like skylights. From a ladder or attic, look for daylight, wet insulation, or stained rafters.
- Upper-floor plumbing: Stains appear when someone runs a shower, toilet, or sink above. A circular stain directly below a bathroom fixture is a strong indicator. Check supply lines, drain connections, and wax ring seals.
- HVAC and condensate lines: A slow, recurring drip near an air handler or ductwork often points to a clogged condensate drain line. Condensation on poorly insulated ducts can also drip onto ceiling drywall over time.
- Appliance leaks: Dishwashers, refrigerators with ice makers, and washing machines on upper floors can leak slowly for weeks before the ceiling below shows damage.
- Exterior intrusion: Water entering around window frames, wall penetrations, or foundation cracks can travel horizontally and appear as a ceiling stain near an exterior wall.
The shape of the stain offers clues too. A tight circular ring suggests a slow, steady drip from a fixed point. A fan-shaped or elongated stain suggests water running along a joist or pipe before dripping.
Step-by-step actions to limit damage right now
Once you've confirmed safety, work through these steps in order. Speed matters because one visible stain can mask a much larger moisture spread above the ceiling, and mold can begin developing within 24–48 hours in wet conditions.
- Stop the source. Shut off the water supply valve for the affected fixture or the main shutoff if you can't isolate it. For a roof leak, place a tarp over the exterior breach if it's safe to do so.
- Contain the water. Position buckets under active drips. Lay old towels or plastic sheeting on floors and furniture below the affected area.
- Drain a bulging ceiling safely. If the ceiling is visibly swollen with trapped water, poke a small hole at the lowest point of the bulge with a screwdriver after placing a bucket below. This controlled release prevents a sudden collapse.
- Cut power to the affected zone. Go to your breaker panel and turn off circuits serving the room with the leak. Don't restore power until the area is fully dry and inspected.
- Remove valuables and move furniture. Get rugs, electronics, and upholstered furniture out of the room before water spreads further.
- Document everything for insurance. Take timestamped photos and short video of the stain, the drip, any visible damage, and the source if you can reach it. Note the time you discovered the leak and who you called.
Pro Tip: Keep a written log of every call you make — to your insurer, a plumber, or a restoration company. Note the date, time, and name of the person you spoke with. Insurers sometimes dispute claims based on response timing, and a written record protects you.
⚠️ If water is dripping from a ceiling fixture and you cannot safely cut power, leave the room and call an electrician or emergency restoration service before re-entering.
When can you DIY, and when do you need a pro?
The honest answer: most ceiling water damage situations benefit from at least a professional assessment, even if the repair itself is minor. The risk isn't the visible stain — it's what's hiding above it.
DIY is reasonable when all of these are true:
- The source is confirmed fixed and has been dry for at least 48–72 hours
- The stain is small (roughly less than a square foot), dry, and firm to the touch
- No mold is visible, and there's no musty odor
- The ceiling drywall is not soft, sagging, or crumbling
- Water was clean (not from a sewage line or contaminated source)
- No electrical fixtures are in or near the affected area
Call a restoration professional when any of these apply:
- The wet area is large or you can't confirm the full extent of moisture
- The drywall is soft, sagging, or shows signs of structural compromise
- You see or smell mold
- The water source was a toilet, sewage line, or anything that may be contaminated
- The leak recurs or you cannot identify the source
- Water reached electrical fixtures or wiring
The IICRC S500 standard — the industry benchmark for water damage response — classifies events by contamination category and saturation class. When insulation and joist cavities are saturated (Class 3 or 4 events), professional drying equipment is required. No amount of household fans will adequately dry a saturated ceiling cavity, and incomplete drying leads directly to mold and structural decay.
Homeowner-appropriate tasks: contain water, document damage, basic surface drying with fans, cosmetic patching of small dry stains.
Professional tasks: moisture mapping, structural drying with air movers and dehumidifiers, mold remediation, contaminated-water extraction, drywall demolition and replacement, electrical safety checks.
What restoration professionals actually do
A professional restoration job follows a structured sequence, and understanding it helps you evaluate estimates and avoid being oversold or undersold.
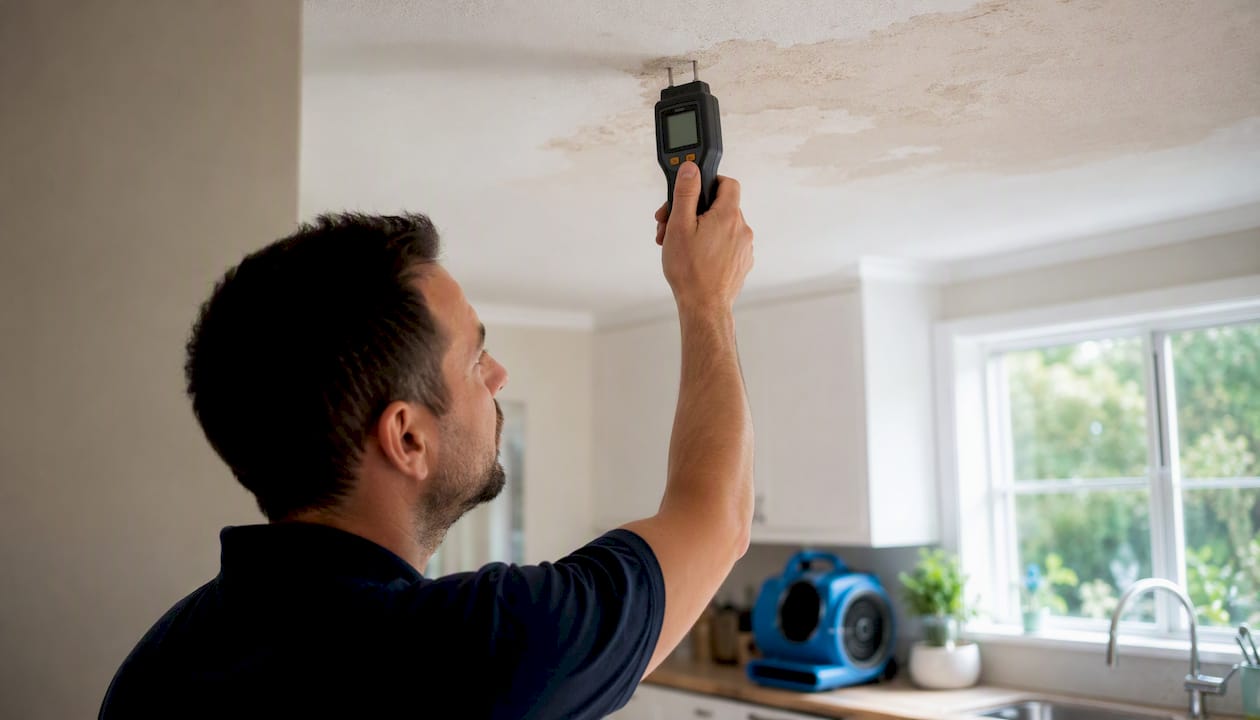
Assessment and moisture mapping
The first step is locating the full extent of moisture, not just the visible stain. Pros use penetrating moisture meters, non-invasive infrared cameras, and leak detection techniques to map wet zones in drywall, insulation, and framing. They may open a small access panel to inspect insulation and joist cavities before committing to larger demolition. This limits unnecessary teardown while confirming full drying is achievable.
Drying and mitigation
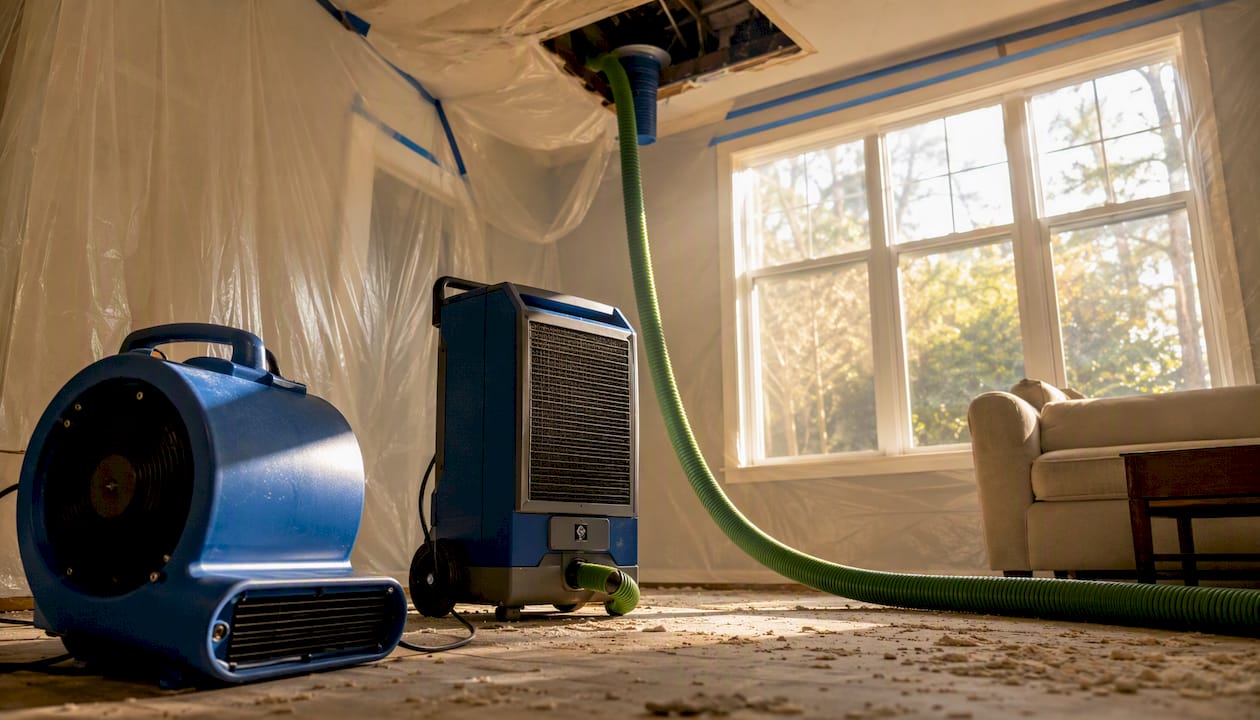
Industrial air movers and dehumidifiers run continuously — sometimes for several days — to bring moisture levels down to safe readings. For saturated joist cavities, injectidry systems push dry air directly into enclosed spaces. Antimicrobial treatments are applied when contamination risk is present.
Repair and reconstruction
Once moisture readings confirm the structure is dry, wet insulation and damaged drywall are removed and replaced. Joists are inspected for rot or structural compromise. New drywall is installed, taped, mudded, sanded, primed, and painted. A postjob moisture verification confirms the work is complete.
Typical cost ranges by damage level:
| Damage Level | Typical Repair Cost | What It Usually Includes |
|---|---|---|
| Minor (cosmetic) | $400 (cosmetic fix) | Stain-blocking primer, paint, small drywall patch |
| Moderate | $5,000 (structural repair) | Drywall section replacement, insulation, drying |
| Severe (structural) | $5,000+ | Joist repair, full ceiling replacement, mold remediation |
These ranges come from industry cost data and exclude the cost to fix the leak source itself — plumbing or roofing repairs are billed separately. Mold remediation, contaminated-water extraction, and structural repairs push costs toward the higher end quickly.
A typical timeline runs from two to seven days for drying, followed by one to three days for reconstruction on moderate jobs. Severe cases with mold or structural damage can run two to four weeks.
How to repair a small, dry ceiling stain yourself
This process applies only to stains that are fully dry, small, free of mold, and backed by firm drywall. If any of those conditions aren't met, stop and call a pro.
Confirm the job is DIY-eligible:
- Source is fixed and confirmed dry for at least 72 hours
- No soft spots, sagging, or visible mold
- Stain is smaller than roughly one square foot
- No electrical fixtures nearby
Step-by-step repair:
- Protect yourself. Put on gloves and an N95 mask before sanding. Turn off the circuit if you're working near any fixture.
- Remove loose paint. Use a putty knife or paint scraper to remove any bubbling, peeling, or flaking paint around the stain.
- Sand the area smooth. 120-grit sandpaper works well. Feather the edges so the repair blends with the surrounding ceiling.
- Apply stain-blocking primer. This is the step most DIYers skip and then regret. A water-based stain-blocking primer (Zinsser BIN or Kilz Original are widely available) seals the mineral deposits that cause stains to bleed through regular paint. Let it dry fully.
- Patch any damaged drywall. For small holes or soft spots, use a pre-mixed joint compound and a drywall patch kit. Apply in thin coats, letting each coat dry before sanding.
- Tape and mud larger repairs. For patches larger than a few inches, use mesh tape and joint compound. Apply two to three thin coats, sanding between each.
- Prime the patch. Apply a second coat of stain-blocking primer over the patched area.
- Paint to match. Use ceiling paint in the same sheen as the surrounding ceiling. Two coats usually cover well.
Pro Tip: Texture matching is the hardest part of a DIY ceiling repair. Before painting, compare the existing ceiling texture to your patch. A light orange-peel texture can be replicated with a spray can texture product from any hardware store. Test on cardboard first.
Estimated time: 2–4 hours of active work spread over two to three days (drying time between coats is the main variable). Materials typically run $40–$80 for a small repair.
How to prevent ceiling leaks before they start
Most ceiling water damage is preventable with consistent seasonal maintenance. These tasks take a few hours a year and cost almost nothing compared to a $2,000 repair.
Seasonal maintenance checklist:
- Clean gutters every spring and fall. Clogged gutters cause water to back up under roofing and eventually penetrate the ceiling below the eave line.
- Inspect roof flashing annually. Check the metal flashing around chimneys, skylights, and vent pipes for cracks, gaps, or rust. This is the most common entry point for rain-only leaks.
- Check attic ventilation and insulation. Poor attic ventilation causes condensation that drips onto ceiling drywall from above. Insulation should be dry and evenly distributed.
- Inspect upstairs plumbing supply lines and appliance hoses. Washing machine hoses and refrigerator ice-maker lines are common slow-leak culprits. Replace rubber hoses with braided stainless steel versions every five to seven years.
- Clear HVAC condensate drain lines. Pour a cup of diluted bleach down the condensate drain line once a year to prevent algae blockages that cause overflow.
- Ensure bathroom exhaust fans vent outside. A fan that vents into the attic deposits moisture-laden air directly onto insulation, which eventually saturates and drips. Check the duct termination at the roof or soffit.
- Insulate cold water pipes in unconditioned spaces to prevent condensation dripping, and consider insulating hot water pipes to reduce heat-related moisture issues in attics.
Worth considering: A water leak detector placed near appliances and under sinks alerts you within seconds of a drip. Automatic shutoff valves that cut water supply when a sensor detects moisture can prevent a minor drip from becoming a ceiling collapse while you're away. Neither requires professional installation.
Insurance and what ceiling repairs actually cost
Insurance coverage for ceiling water damage turns almost entirely on one question: was the damage sudden and accidental, or did it develop gradually from neglect? Insurers cover the former and routinely deny the latter.
What insurers typically cover:
- A pipe that burst suddenly
- An appliance that failed without warning
- Storm damage that caused a roof breach
What insurers typically exclude:
- A slow leak that went unaddressed for months
- Damage from a roof that was already in poor condition
- Gradual condensation damage from inadequate ventilation
Documentation checklist for your claim:
- Timestamped photos and video of the damage, taken immediately
- Written record of when you discovered the leak and what you did first
- Receipts for any emergency mitigation work (buckets, fans, a restoration company's emergency visit)
- Contractor estimates for repair
- Written confirmation that the source has been fixed
Call your insurer the same day you discover the damage. Early notification matters — some policies require it, and a delayed call can give an adjuster grounds to question the timeline. Documenting damage immediately and keeping mitigation receipts significantly improves claim outcomes.
The cost ranges below reflect repair costs only and exclude fixing the leak source:
| Damage Level | Typical Repair Cost | Notes |
|---|---|---|
| Minor (cosmetic stain) | $400 (cosmetic fix) | Primer, paint, small patch; DIY possible |
| Moderate (drywall replacement) | $5,000 (structural repair) | Insulation, drywall, drying equipment |
| Severe (structural or mold) | $5,000+ | Joist repair, mold remediation, full ceiling |
These figures reflect industry-sourced cost ranges for the ceiling repair itself. Plumbing or roofing repairs that caused the leak are separate line items.
Purerestomd's perspective on ceiling water damage
The calls that concern us most aren't the dramatic ones — a burst pipe flooding a bathroom is obvious and gets addressed fast. The calls that lead to the worst outcomes are the ones that come in weeks after a homeowner noticed a small stain, assumed it was old, and painted over it.
By the time we arrive at those jobs, the insulation above is saturated, the framing shows early rot, and mold has established itself behind the drywall. What would have been a $1,200 repair at week one is now a $6,000 remediation job. The stain was the warning, not the problem.
Our approach starts with safety — electrical checks before anything else — and then moisture mapping to understand the full scope before we touch a single piece of drywall. IICRC-aligned assessment means we're not guessing at drying times or cutting corners on contamination classification. We also handle insurance coordination directly, which removes the back-and-forth that delays most homeowner claims.
If you're in Maryland and you're looking at a wet ceiling right now, the right move is a professional assessment before you decide whether to DIY or repair. The assessment itself tells you what you're actually dealing with.
Purerestomd responds 24/7 to ceiling water damage in Maryland
When a ceiling leak hits at 11 PM on a Sunday, waiting until Monday morning costs you real money in additional damage. Purerestomd provides 24/7 emergency water damage restoration across Maryland with a 30-minute response time — meaning a certified team is on-site before most homeowners have finished mopping up the first wave.

The process is straightforward: you call, a crew dispatches immediately, and the assessment begins on arrival. Moisture mapping, contamination classification, and a full mitigation plan happen in the first visit. Purerestomd bills your insurance directly, so you're not fronting costs and waiting for reimbursement. If mold is a concern, professional mold inspection is part of the same coordinated response. For contents affected by water, carpet and upholstery cleaning is available as part of the full restoration service.
Call Purerestomd now to schedule an emergency assessment or get a free estimate for your ceiling repair.
Sources
- IICRC S500 standard
- How to repair a water-damaged ceiling | Home Depot
- How to Troubleshoot and Repair a Leaking Ceiling | The Spruce
- Water leaking from the ceiling: causes, damage assessment, and repair options | Intelligent Choice Builders
- What to do when you find ceiling water damage | Forbes
FAQ
How long does it take for a ceiling to dry after a leak?
A ceiling typically takes 2–7 days to dry fully, depending on how saturated the drywall and insulation are. Professional drying with air movers and dehumidifiers shortens that window significantly compared to household fans alone.
Can ceiling water damage cause mold?
Yes. Mold can begin developing within 24–48 hours in wet conditions, and a stain that looks dry on the surface can still harbor active mold growth behind the paint or inside the insulation above.
Does homeowners insurance cover ceiling water damage?
Most policies cover sudden, accidental damage — a burst pipe or storm breach — but exclude gradual leaks from deferred maintenance or a deteriorating roof. Call your insurer the same day you discover the damage and document everything immediately.
What does a sagging ceiling mean?
A sagging or bulging ceiling means the drywall has absorbed enough water to lose structural integrity and may be close to collapse. Keep people out of the room, cut power to the area, and call a restoration professional immediately.
When should I call Purerestomd instead of attempting a DIY repair?
Call Purerestomd when the wet area is large, the drywall is soft or sagging, you see or smell mold, or the water source was contaminated. Purerestomd's 30-minute emergency response and IICRC-aligned assessment determine the full scope before any repair work begins.