
Most bathroom mold is manageable by a healthy adult if the affected area stays under 10 square feet, but anyone with asthma, allergies, or a compromised immune system should stay out of the room until cleanup is complete.
If you just spotted a dark patch in your shower or ceiling corner, here is what to do right now:
- Move vulnerable people out of the bathroom and keep them away until the area is clean and dry.
- Open a window or run the exhaust fan to push air outside before you touch anything.
- Put on an N95 respirator, non-latex gloves, and sealed goggles before getting close to the mold.
- Photograph the affected area for your records, especially if you plan to file an insurance claim.
- Measure the patch. If it covers more than 10 square feet, or if you suspect it extends behind the wall, stop and call a professional.
Key Takeaways
Black mold in the bathroom is manageable for healthy adults when the patch stays under 10 square feet, but vulnerable occupants should stay out, proper PPE is non-negotiable, and hidden or recurring growth requires professional remediation.
| Point | Details |
|---|---|
| EPA 10 sq ft rule | Healthy adults can typically clean patches under 10 sq ft; larger areas need a professional. |
| PPE is non-negotiable | Wear an N95 respirator, sealed goggles, and non-latex gloves before touching any mold. |
| Replace, don't just clean | Caulk and grout with rooted mold must be physically removed; bleach alone won't fix porous materials. |
| — | Run the exhaust fan 20–30 minutes after every shower, and keep indoor humidity under 50%. |
| Purerestomd for larger jobs | IICRC-certified mold inspection and remediation in Maryland with direct insurance billing and 30-minute response. |
Table of Contents
- What black mold in the bathroom actually is and why it keeps coming back
- How to tell if it's mold, mildew, or something else
- Health risks from bathroom mold and who is most at risk
- How to prepare safely before you start cleaning
- Step-by-step DIY cleanup by surface
- When to call a professional instead of doing it yourself
- How to stop bathroom mold from coming back
- What to expect for time and cost
- What a professional remediation actually looks like
- When the job is bigger than a DIY fix
- Sources
- FAQ
What black mold in the bathroom actually is and why it keeps coming back
The term "black mold" gets thrown around loosely. Most of the dark growth you find in bathroom grout or caulk is Cladosporium, Aspergillus, or Penicillium, not the infamous Stachybotrys chartarum that headlines call "toxic black mold." Stachybotrys is slow-growing, needs continuously saturated cellulose material (like drywall soaked for days), and is far less common in tile showers than the others. For a small DIY job, the exact species rarely changes what you do. What matters is that mold is present, it is growing, and the conditions that fed it are still there.
Every bathroom mold problem comes down to the same three ingredients: moisture, a surface to grip, and poor air movement. Showers can push relative humidity above 80% in an unventilated bathroom, and that moisture lingers on porous grout and caulk long enough for spores to take hold. Soap scum and body oils give mold an organic food source on surfaces that look clean. Add a clogged or undersized exhaust fan, and the conditions are nearly perfect.
Common sources worth checking:
- Steam from showers and baths that condenses on walls, ceilings, and window frames
- Slow plumbing leaks behind the shower valve, under the sink, or at the toilet base
- Continuous condensation on cold windows or exterior walls during winter
- Exhaust fans venting into the attic instead of outdoors, which just moves humid air to another problem area
- Cracked or degraded grout and caulk that let water seep into the substrate behind tiles
How to tell if it's mold, mildew, or something else
Mildew is a surface fungus. It sits on top of a material, looks powdery or flat gray-white, and wipes off with a damp cloth and a little detergent. Mold goes deeper. It tends to look dark green, brown, or black, often with a wet or slimy texture when active. It grows in circular or irregular patches and leaves a stain even after you wipe the surface.
Visual cues to look for:
- Dark or greenish-black spots in grout lines, especially in corners and along the floor
- Persistent discoloration in silicone caulk that returns within days of cleaning
- Black or gray staining on the ceiling, particularly above the shower
- Fuzzy or slimy texture on tile surfaces or the underside of a bath mat
Smell and texture clues:
- A musty, earthy odor that persists even after the bathroom has been cleaned and aired out
- Soft or spongy drywall near the tub surround or under the sink cabinet
- Paint that bubbles, peels, or blisters on a wall adjacent to plumbing
Signs of hidden growth are trickier. If you clean a spot and it returns within a week, the mold has roots below the surface or there is a moisture source you have not found yet. A musty smell with no visible growth often means mold is behind the wall, under the floor, or inside the exhaust fan housing. Ceiling staining or sagging near a bathroom above another room is a red flag for a slow leak feeding growth inside the structure.
Pro Tip: Lift the bath mat and check the floor underneath at least once a week. Trapped moisture under a rubber-backed mat is one of the most overlooked mold spots in any bathroom.
Health risks from bathroom mold and who is most at risk
Mold exposure affects people differently. For most healthy adults, a small bathroom patch causes mild irritation at worst. For others, the same exposure can trigger a serious reaction.
The CDC recommends that people with asthma, COPD, allergies, weakened immune systems, or other respiratory conditions avoid mold-affected areas entirely and should not participate in cleanup. Children and the elderly fall into this category as well.
Short-term symptoms from mold exposure include:
- Sneezing, runny nose, and nasal congestion
- Eye, nose, and throat irritation
- Coughing or wheezing
- Worsening asthma symptoms or new-onset breathing difficulty
Seek medical advice if symptoms persist after leaving the mold-affected area, if a household member with asthma has a significant flare-up, or if anyone develops a fever or shortness of breath. The WHO notes that mycotoxin concerns depend heavily on species and context, which is another reason large or hidden growth warrants professional assessment rather than a DIY guess.
The EPA's guidance reinforces that for most household cases, visible removal and moisture control are the right response. Routine air testing is generally not necessary unless health symptoms persist after remediation or the source of growth cannot be found.
This article provides general information, not medical advice. If you or a household member experience persistent or severe symptoms, consult a healthcare provider.
How to prepare safely before you start cleaning
Skipping PPE is the most common DIY mistake. Scrubbing mold without protection aerosolizes spores directly into your breathing zone. The CDC's cleanup guidance sets a clear minimum: a NIOSH-approved N95 respirator, non-latex gloves, and goggles that seal against your face. Add long sleeves and old clothes you can bag immediately after.
Ventilation and containment:
- Open the bathroom window before you start and keep it open throughout.
- Run the exhaust fan to push air outside, not just recirculate it. If your fan vents into the attic, skip it and rely on the window.
- For jobs approaching the 10 sq ft limit, hang plastic sheeting in the doorway to keep spores from spreading to the rest of the home.
- Turn off any forced-air HVAC vents in the bathroom during cleanup to avoid pulling spores into the duct system.
Things that will make the situation worse:
- Mixing bleach with ammonia-based cleaners or acidic products like vinegar. The fumes are toxic.
- Painting over mold. It hides the problem for a few weeks and then comes back worse.
- Dry brushing or using a standard vacuum. Both launch spores into the air. Use a damp cloth or a HEPA-filter vacuum only.
- Attempting structural repairs (cutting out drywall, removing tile) without proper containment if significant water damage is present.
Supplies to gather before you start:
- N95 respirator, sealed goggles, non-latex gloves, long-sleeved shirt
- Plastic sheeting and painter's tape (for larger jobs)
- Spray bottles, stiff-bristle brush, old toothbrush for grout
- Chosen cleaning solution (see recipes below)
- Heavy-duty trash bags for contaminated materials
- Clean rags or paper towels for drying
Step-by-step DIY cleanup by surface
Work top to bottom: ceiling first, then walls, then floor. Lightly mist the moldy area with water before scrubbing to keep spores from going airborne. Photograph the area before and after.
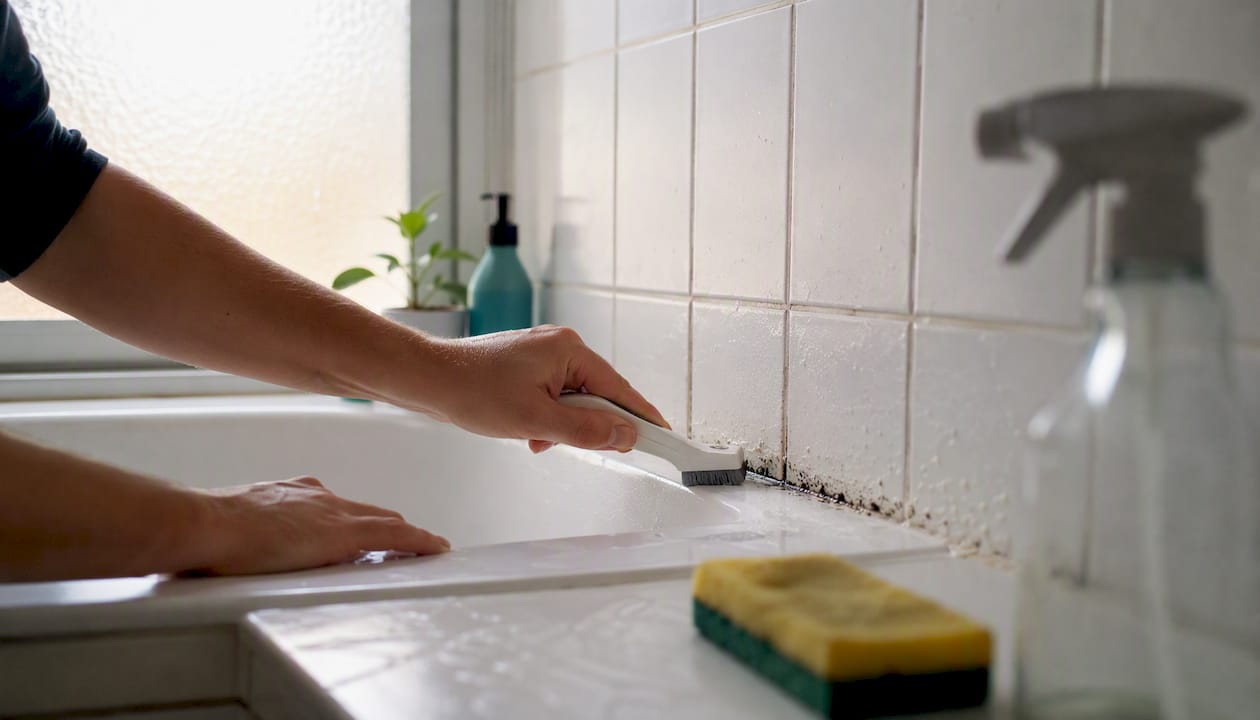
The practical four-step framework that works for most bathroom jobs: ventilate and protect yourself, clean hard surfaces, replace porous contaminated materials, then dry the room and control humidity.
Cleaning solution recipes and contact times
| Solution | Mix | Contact time | Best for |
|---|---|---|---|
| Bleach solution | 1 cup bleach per 1 gallon water | 5–10 minutes | Glazed tile, glass, tub surround |
| 3% hydrogen peroxide | Ready to use | ~10 minutes | Grout, caulk (color-safe) |
| White vinegar (undiluted) | Ready to use | ~60 minutes | Light surface mold, natural option |
| Baking soda paste | Mix with water to paste | 10 minutes | Grout scrubbing, odor |
Test any solution on a small hidden area first. Bleach can discolor colored grout and some finishes. Never mix bleach with vinegar or any ammonia-based product.
Surface-by-surface instructions
-
Glazed tile and glass: Spray with bleach solution or detergent, let it sit for the full contact time, scrub with a stiff brush, rinse thoroughly, and dry with a clean cloth. Mold on non-porous surfaces like glazed tile rarely roots deeply, so this is usually a one-pass job.
-
Grout lines: Apply hydrogen peroxide or a commercial grout cleaner gel. Work it in with an old toothbrush, allow full contact time, scrub, and rinse. Once clean and fully dry, apply a penetrating grout sealer to close the pores. Unsealed grout is an open invitation for the next cycle of growth.
-
Silicone or caulk: If the mold is sitting on the surface, try hydrogen peroxide first. If the caulk has turned black throughout its thickness, the mold has rooted inside the material. Cut it out completely, clean the substrate, let it dry for at least 24 hours, and apply fresh mold-resistant silicone caulk. Experts treat mold like a weed: physical removal of the roots matters as much as the cleaning product you use.
-
Painted drywall: Use a mild detergent solution and a damp cloth. Do not saturate the wall. If the surface feels soft, spongy, or the paint is bubbling, the mold has penetrated the drywall. At that point, cleaning the surface is pointless. Cut out and replace the affected section.
-
Shower curtains and fabric liners: Machine wash on the hottest setting the fabric allows with detergent and a cup of white vinegar. If the liner is heavily stained or the mold has been there for weeks, replacement is cheaper and more reliable than laundering.
Pro Tip: When replacing caulk, run a bead of painter's tape on both sides of the joint before applying the new silicone. Pull the tape while the caulk is still wet for a clean, professional line that seals completely with no gaps.
When to call a professional instead of doing it yourself
The EPA's 10 sq ft guideline is a useful starting point, but it is not the only factor. A 6 sq ft patch of surface mold on tile is a DIY job. A 6 sq ft stain on drywall next to a leaking pipe is not.
Call a professional when any of these apply:
- The affected area covers more than 10 square feet
- Mold returns within days of a thorough cleaning, suggesting a hidden moisture source
- You smell mold but cannot find it visually, which often means growth is inside a wall or under the floor
- The drywall, subfloor, or ceiling feels soft, is stained from above, or shows structural damage
- The mold is near or inside HVAC ducts or the exhaust fan housing
- The growth followed a significant water event (burst pipe, flooding, roof leak)
- Any household member has developed respiratory symptoms that improve when they leave the home
Professionals bring tools and methods that DIY simply cannot replicate. Moisture meters locate hidden saturation behind walls without demolition. Negative air pressure containment keeps spores from migrating to other rooms during removal. HEPA air scrubbers capture particles down to 0.3 microns. Controlled demolition and documented disposal protect you if an insurance claim is involved. If mold keeps returning after cleaning, hidden moisture or growth behind surfaces is the likely cause, and a professional moisture assessment is the right next step.
How to stop bathroom mold from coming back
Cleaning mold without fixing the conditions that caused it is a short-term fix. The most effective long-term defenses are consistent habits and a few targeted upgrades.
Daily habits that make a real difference:
- Squeegee shower walls and the glass door after every use. It takes 30 seconds and removes most of the standing moisture mold needs.
- Leave the shower curtain or door open between uses so air can circulate inside.
- Hang wet towels to dry outside the bathroom or in a well-ventilated spot, not on a hook behind the door.
- Wipe up any puddles on the floor immediately.
Weekly and monthly tasks:
- Launder bath mats and towels weekly.
- Scrub grout lines and corners with a brush and your preferred cleaner.
- Inspect caulk lines for cracks, gaps, or discoloration and replace any section that looks compromised.
- Reseal grout once or twice a year with a penetrating sealer.
Ventilation and humidity targets
For bathrooms with no window and a weak fan, a HEPA-equipped air purifier can reduce airborne spore counts between cleanings. If your home sits in a humid climate or the bathroom humidity stays stubbornly high, a dedicated dehumidifier is worth the investment. When renovating, choose nonporous wall panels, mold-resistant drywall (Type X or paperless), and humidity-sensing exhaust fans that run automatically when moisture spikes.
What to expect for time and cost
DIY cleanup time estimates:
- Small grout or tile spot (under 1 sq ft): 30–60 minutes including prep and drying
- Full shower grout scrub and reseal: 2–4 hours
- Replacing caulk on a tub surround: 1–2 hours plus 24 hours cure time before use
- Cutting out and replacing a small section of drywall: half a day, assuming no hidden structural issues
Professional remediation timeline and cost drivers:
| Job scope | Typical timeline | Key cost drivers |
|---|---|---|
| Small surface remediation (tile/grout) | 1 day | Labor, containment setup, disposal |
| Caulk/grout removal and replacement | 1–2 days | Materials, labor, sealing |
| Drywall removal and replacement | 2–5 days | Demolition, drying time, repairs |
| Large water damage with hidden growth | 5–10 days or more | Moisture mapping, drying equipment, clearance testing |
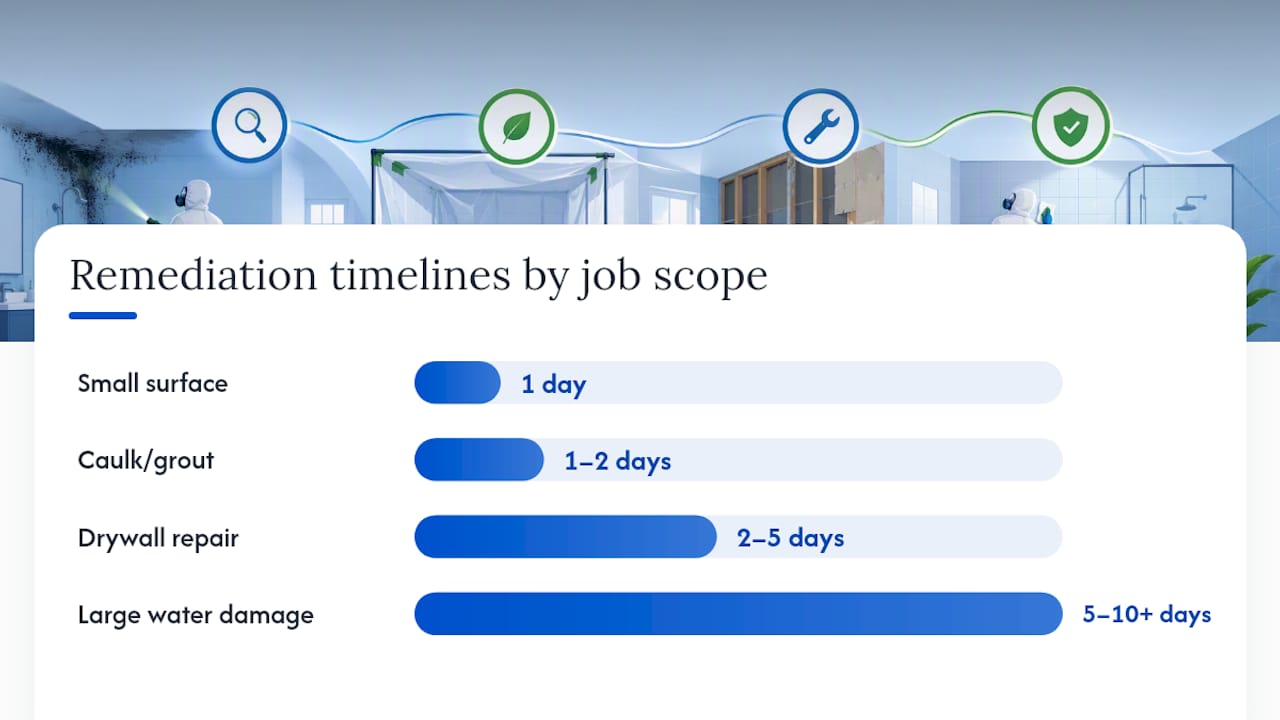
Professional quotes vary based on the area affected, containment requirements, whether demolition is needed, and drying equipment rental. When getting quotes, ask specifically: What is included in containment? Will you provide pre- and post-remediation moisture readings? Is clearance testing included or billed separately? Does the scope cover repairs, or just removal?
What a professional remediation actually looks like
Knowing the process helps you evaluate contractors and spot anyone cutting corners.
The standard professional workflow
-
Initial inspection and moisture assessment: The remediator uses a moisture meter and sometimes a thermal imaging camera to map wet areas, including behind walls and under floors. This step defines the true scope of the job.
-
Containment setup: Plastic sheeting seals off the work area. A negative air machine creates lower air pressure inside the containment zone so that any disturbed spores flow toward the machine's HEPA filter rather than into the rest of the home.
-
Controlled removal of contaminated materials: Moldy drywall, insulation, caulk, and grout are removed carefully and double-bagged in heavy-duty plastic for disposal. Nothing contaminated leaves the containment zone unsealed.
-
HEPA vacuuming and air scrubbing: All surfaces in the work area are HEPA-vacuumed, then wiped with an antimicrobial solution. Air scrubbers run continuously to capture airborne particles.
-
Structural drying: Commercial dehumidifiers and air movers dry the structural components to target moisture levels before any repairs begin. Skipping this step is the most common reason mold returns after a professional job.
-
Repairs and final clearance: Once dry, repairs (new drywall, caulk, paint) are completed. A clearance inspection, which may include air or surface sampling, confirms the area is within acceptable limits before the containment comes down.
Credentials and documentation to request:
- IICRC certification (look for WRT or AMRT designations)
- Written scope of work before the job starts
- Pre- and post-remediation photographs
- Moisture readings at the start and at clearance
- A written clearance report at the end
What to have ready for the first visit:
- Photos you took when you first noticed the mold
- Dates when you first noticed the problem or any related water event
- Any health symptoms household members have experienced
- Your homeowner's or renter's insurance information (many remediation companies handle direct billing)
- Questions about timeline, containment procedures, and what repairs are included in the scope
What most homeowners get wrong about bathroom mold
The single most common mistake is painting over it. A fresh coat of paint looks like a fix, and it is not. The mold is still there, still growing, and now it has a sealed surface to push against. Within weeks, the paint bubbles and the stain bleeds through, usually worse than before.
The second mistake is stopping too soon. Homeowners scrub the visible patch, it looks clean, and they consider the job done. But if the caulk is black all the way through, or if the grout has been stained for months, surface cleaning is not enough. The mold has roots. Physical removal, meaning cutting out the caulk or regrouting, is the only real solution for porous materials. Bleach kills surface cells on nonporous materials, but it does not penetrate porous substrates deeply enough to eliminate embedded growth.
The third mistake is ignoring the exhaust fan. A fan that vents into the attic, or one that is undersized for the bathroom, is barely better than no fan at all. If your bathroom still smells musty 20 minutes after a shower, the fan is not doing its job. That is the single upgrade with the highest return for preventing recurrence. Pair it with a HEPA air purifier for mold spores in bathrooms where ventilation upgrades are not immediately possible, and you cut the airborne spore load significantly between cleanings.
One spot that almost everyone misses: the underside of the exhaust fan cover. Pull it off and look inside. Mold growing inside the fan housing is pumping spores into the air every time the fan runs. Clean or replace the housing before you do anything else.
When the job is bigger than a DIY fix
If you have worked through this guide and the mold keeps coming back, or if the patch is larger than a standard sheet of paper, the most reliable next step is a professional inspection.
Purerestomd provides 24/7 emergency water damage restoration and mold inspection and remediation across Maryland, with a 30-minute emergency response time and IICRC-certified technicians. The difference from a standard handyman call: Purerestomd uses moisture mapping to find growth you cannot see, sets up proper negative-air containment so spores do not spread during removal, and handles direct insurance billing so you are not managing paperwork during a stressful situation. Homeowners in Bowie, Crofton, Laurel, and surrounding Maryland communities can schedule an inspection with a clear scope of work, pre- and post-remediation documentation, and a written clearance report. Have your photos, dates, and insurance information ready when you call.
Sources
- Mold Clean Up Guidelines and Recommendations | CDC
- How to Get Rid of Mold in the Bathroom, According to Experts | Martha Stewart
- How to Get Rid of Bathroom Mold: A Plain Guide - InspectandTest
For readers in Maryland, Purerestomd's mold inspection services cover Columbia, Adelphi, Bethesda, and surrounding communities. Professional inspection is recommended when mold recurs after cleaning, when a musty odor persists without visible growth, or when any household member has developed respiratory symptoms.
This article is general information, not a substitute for advice from a qualified doctor. Consult a qualified healthcare professional about your own circumstances before acting on anything here.
FAQ
Is black mold in the bathroom toxic?
Most bathroom mold is not Stachybotrys chartarum, the species commonly called "toxic black mold." All mold can cause irritation and health effects, especially in sensitive individuals, but the word "toxic" is often overstated for common bathroom species.
How quickly will black mold make you sick?
Symptoms like sneezing, eye irritation, and coughing can appear within hours of exposure in sensitive individuals. People with asthma or allergies may notice worsening symptoms faster; healthy adults often experience only mild irritation from brief exposure to small patches.
Can I stay in a house with black mold?
For small, contained bathroom patches, most healthy adults can remain in the home while keeping the affected room closed and ventilated. If the growth is large, hidden, or causing respiratory symptoms in any household member, staying elsewhere during remediation is the safer choice.
What should I do if I have black mold in my bathroom?
Keep vulnerable household members out of the bathroom, ventilate the space, put on an N95 respirator and gloves, and measure the affected area. Patches under 10 square feet on non-porous surfaces are generally safe for a healthy adult to clean using the bleach solution or hydrogen peroxide methods described above. Larger patches, soft drywall, or recurring growth after cleaning are signals to call a certified remediator like Purerestomd.